Microsoft Azure and GitHub Actions… In the realm of modern software development, orchestrating workflows efficiently is paramount, and this dynamic duo offers a synergy that can elevate your projects to new heights. In this guide, we’ll walk you through the process of establishing a secure and robust connection to Microsoft Azure directly from your running GitHub Actions workflow. By combining the automation of GitHub Actions with the versatile capabilities of Azure, you’ll unlock a realm of possibilities for deploying, managing, and scaling your applications effortlessly. Let’s delve into the intricacies of this integration and empower your development journey like never before.
Introduction
In this post, I will explain how to connect your GitHub Actions workflow to your Azure environment. This allows you to deploy (for example) cloud infrastructure using Infrastructure As Code and your software system on that cloud infrastructure. Connecting from GitHub Actions to Azure is already possible for quite some time.
Connecting to Azure in theory
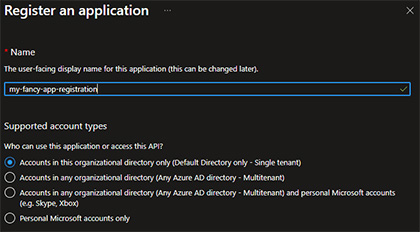 To be able to connect from an automated system, you often use Azure Service Principals. You can create one using the Azure CLI, or in the portal. In the Azure Portal, navigate to ‘Azure Active Directory’ and then ‘App Registrations’.
Click on [ Add > App registration ] to create a new App Registration and name the App Registration. Leave the ‘Accounts in this organizational directory only’ selected and click the ‘Register’ button to create your App Registration.
This App Registration will, under the hood, create an identity (the Service Principal) in Active Directory so that you can assign roles to that identity.
Assigning roles is not within the scope of this blog post. If you would like to deploy cloud infrastructure, you need to assign quite powerful roles because the underlying Service Principal needs to deploy resources and maybe even assign roles to those resources. For this example, I assigned the
Contributorrole to one of my Azure Subscriptions, this may not necessarily be the best for you.
Allowing for more secure connections
As mentioned, connecting to Azure from GitHub Actions has been supported for quite a while now, but there is a fairly new way to do so, the OIDC connection. OIDC (Open ID Connect) allows you to register a system as a trusted party in Azure as soon as it can prove its identity. This OIDC connection is quite recently supported and considered to be more secure because it doesn’t require you to use any secrets. Although GitHub allows you to store secrets in your repository in a safe way, there is still the risk of leaking them accidentally somewhere, allowing for a potential breach. This new OIDC connection does not make use of a secret and is therefore the successor of its previous method. You do need to adjust some configuration here and there to get it to run properly.
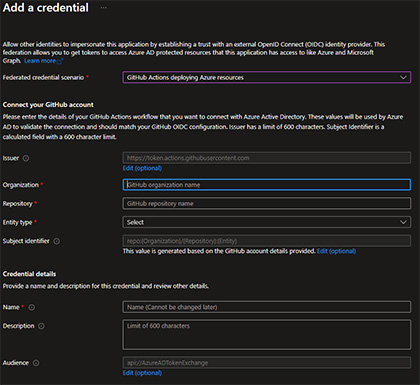
In the Azure Portal, go the the Certificates & Secrets blade of the App Registration you just created and navigate to Federated credentials. Here, you can create a new Federated credential, that is the base of the trust relation between your App Registration (or… the underlying Service Principal) and your GitHub Actions repository.
Creating a Federated Credential
 When you create a Federated Credential, you can select
 GitHub Actions deploying Azure resources as a scenario, which is the one we’re looking for. Then You’ll see that you need to configure some values. First off, the issuer has a default value that is just fine. The organization should be the organization in GitHub you’re GitHub repository is hosted in. If this is a personal project, this will be your GitHub username. Repository should be set to the name of your GitHub Repository. Then you need to select an entity type. This type allows you to configure certain scenarios in your deployment process and allow that specific action. In this example, I selected Branch and in the GitHub branch name, entered main. This allows GitHub Action workflows to connect to Azure using the App Registration identity when the GitHub Action workflow is running on the main branch. Finally, give your Federated Credential a name and an optional description and it should be good to go.
Collecting information
Now you need to configure your GitHub Action so it will connect to Azure using this Federated credential. To do so, you need some information:
- Client ID - Click on the ‘Overview’ blade of your newly created App Registration and look for Application (client) ID;
- Tenant ID - On the same overview page, look for Directory (tenant) ID;
- Subscription ID - Finally you need to target deployments to a certain Azure Subscription. Make sure you have the ID of the Azure Subscription you want to target;
GitHub Actions
Now go to your GitHub Repository (online) and navigate to the Settings tab. Here you can add secret values for GitHub Actions under Secrets and variables > Actions. Add three secrets here:
- AZURE_CLIENT_ID - The value should be set to the Client ID you found in the previous paragraph.
- AZURE_TENANT_ID - The value should be set to the Tenant ID you found in the previous paragraph.
- AZURE_SUBSCRIPTION_ID - The value should be set to the Subscription ID you found in the previous paragraph.
With these three secrets in place, it is time to go and adjust your workflow so it connects to Azure.
Editing your repository
GitHub Actions workflows are created in a special folder called .github/workflows. If you don’t already have a workflow, create these folders and create a .yml file in the workflows directory. If you created a new workflow file, add the following to name the workflow, and allow it to execute when changes are pushed to your main branch:
name: GitHub Actions to Azure

on:
  push:
    branches: [main]
If you already have a workflow up and running, the lines above can be ignored. Then you need to grant permission to your workflow, to authenticate with OIDC, to Azure. To do so, you add the following lines:
permissions:
  id-token: write
  contents: read
Connecting to Azure
Well, you’re almost done. The configuration part is complete, the only thing left is to actually connect to Azure. The snipped below can be appended to the workflow file you have so far if you created a new one. It defines a collection of jobs, containing one job (gh-actions-to-az-connection). The job contains a collection of steps with only one step, and that is to connect to Azure.
jobs:
  gh-actions-to-az-connection:
    runs-on: ubuntu-latest
    steps:
      - name: Az CLI login
        uses: azure/login@v1
        with:
          client-id: ${{ secrets.AZURE_CLIENT_ID }}
          tenant-id: ${{ secrets.AZURE_TENANT_ID }}
          subscription-id: ${{ secrets.AZURE_SUBSCRIPTION_ID }}
Notice that the secrets.SECRET_NAME values in the workflow refer to the secrets you created in your GitHub repository. If you now commit and push this file to your remote repository on GitHub, it will recognize the file as a GitHub Actions workflow and immediately run it because the workflow should be triggered by changes on the main branch.
Conclusion
Unlike the traditional approach of relying on a client ID and secret, the OIDC method streamlines the process by leveraging Azure’s Service Principal. This eliminates the need for manual management of secrets, reducing the risk of exposure and unauthorized access. With OIDC, authentication occurs seamlessly through Azure Active Directory, bolstering security while offering a more streamlined and automated connection setup.
Final footnote
When creating GitHub actions, you should be aware of the way it is structured in order to understand when to connect to Azure using the way described above. For example, different Jobs are assigned to different runners which are in fact different VMs (or containers). When you connect to Azure using the method described above, allows you to (for example) run Azure CLI commands for the remainder of the job, but not cross jobs. When you also want to execute an Azure CLI command in a different job, this job needs a copy of the Login step so the underlying runner of this job is also authenticated.
Last modified on 2023-08-24