Container Apps - With Pollstar
- Part 1 - Container Apps Environment
- Part 2 - The sessions service
- Part 3 - Scaling with KEDA
- Part 4 - Struggling with CORS
In the previous post, I explained the entire solution and showed how I created the ‘base’ infrastructure. This post focuses on the implementation of the first service (or Container App) in the solution. Let’s have a look at what the complete solution architecture is planned to look like.
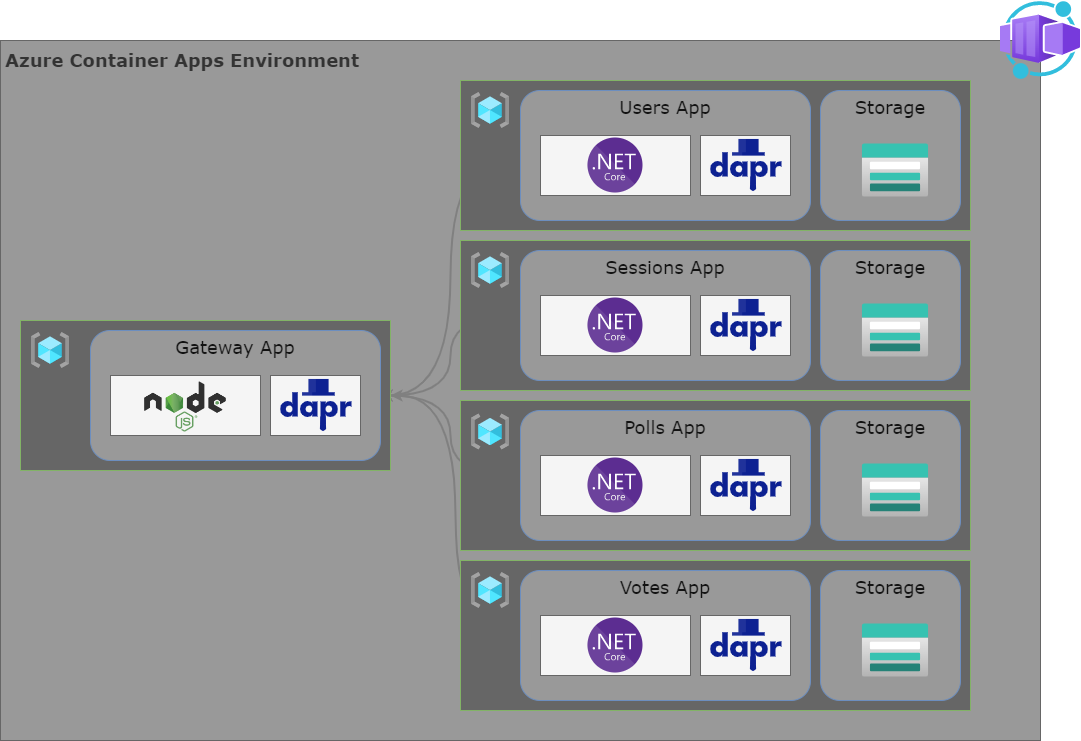
There is one big square gray area that represents my Container Apps Environment. That environment will contain 5 services. One is a NodeJS Reverse proxy to route incoming external traffic to the correct microservice. In a real-world production environment, I would leave this reverse proxy out and use Azure API Management for this purpose. But since this is a demo about containers, let’s make this a container solution as well.
The reverse proxy will communicate using DAPR. DAPR is an abbreviation for Distributed Application Runtime and is a perfect match for the combination of Container Apps and Microservices. DAPR is basically a toolbox of capabilities that you can take advantage of, to make life a little easier when developing microservices. Its capabilities vary from safe and resilient communication between microservices to PubSub, caching, and more.
The sessions service
In Part 1 - Container Apps Environment, I explained what the system should do and how I broke the system apart into multiple microservices. This post is about the Sessions Service. I will not go into further detail for the Users, Polls, and Votes services since these are pretty similar to the Sessions Service from an architectural perspective.
The service itself is a basic Web API project created with Visual Studio 2022 (proper). I enabled docker support that generated a Dockerfile for me. Dockerfiles are text files with layered instructions on how to build a docker image.
Then I added a CORS policy, some health checks, Application Insights, and all that sort of stuff that you need to create a solid, reliable web API.
Storage
There are a couple of strategies here. The most common strategy when creating a microservices architecture is that each service contains its own data store. I decided to go for this strategy. Because I don’t need anything fancy I deploy a Storage Account with Table Storage to store the data for my service.
The Sessions Service
The Sessions Service itself is far from complex. It must be able to create a new session. When a user returns, he must be able to get back to a certain session and continue. Also, attendees of a session will create a real-time connection to the server using Azure Web PubSub. This connection is at the session level. So the Sessions Service also contains a function to enable a client to connect to the real-time service.
Ingress
The service does not accept any traffic from external sources. I will implement a reverse proxy at a later stage that accepts external traffic and redirects that traffic to the appropriate service.
Infrastructure as Code
The IaC part of this service will create a resource group and deploy all required resources in that resource group. While deploying the resources, this service does expect the Container Apps Environment, Application Insights, and Azure Web PubSub to be available.
resource containerAppEnvironments 'Microsoft.App/managedEnvironments@2022-03-01' existing = {
  name: containerAppEnvironmentResourceName
  scope: resourceGroup(integrationResourceGroupName)
}
resource applicationInsights 'Microsoft.Insights/components@2020-02-02' existing = {
  name: applicationInsightsResourceName
  scope: resourceGroup(integrationResourceGroupName)
}
resource webPubSub 'Microsoft.SignalRService/webPubSub@2021-10-01' existing = {
  name: webPubSubResourceName
  scope: resourceGroup(integrationResourceGroupName)
}
This is because the Sessions service needs to integrate into the Container Apps Environment. It creates an Availability Test in Application Insights and creates a valid connection string to Azure Web PubSub for real-time communication.
Storage
For the persistence layer as explained, I use an Azure storage account with table storage. I always like to make sure all required resources are available prior to when a system starts. So for example, when connecting to a Table with a Table Storage Client, I expect to table to be there. Although the Table could be created using this client, doesn’t mean you should. In my opinion, you shouldn’t. So, therefore, I create the storage account including the required tables using IaC.
resource storageAccount 'Microsoft.Storage/storageAccounts@2021-09-01' = {
  name: uniqueString(defaultResourceName)
  location: location
  sku: {
    name: 'Standard_LRS'
  }
  kind: 'StorageV2'
}
resource storageAccountTableService 'Microsoft.Storage/storageAccounts/tableServices@2021-09-01' = {
  name: 'default'
  parent: storageAccount
}
resource storageAccountTable 'Microsoft.Storage/storageAccounts/tableServices/tables@2021-09-01' = [for table in storageAccountTables: {
  name: table
  parent: storageAccountTableService
}]
Creating the Container App
Finally, I will create the Container App, that integrates with the Container Apps Environment.
resource apiContainerApp 'Microsoft.App/containerApps@2022-03-01' = {
  name: '${defaultResourceName}-aca'
  location: location
  identity: {
    type: 'SystemAssigned'
  }
  properties: {
    managedEnvironmentId: containerAppEnvironments.id

    configuration: {
      activeRevisionsMode: 'Single'
      secrets: [
        {
          name: 'storage-account-secret'
          value: listKeys(storageAccount.id, storageAccount.apiVersion).keys[0].value
        }
        {
          name: 'application-insights-connectionstring'
          value: applicationInsights.properties.ConnectionString
        }
        {
          name: 'web-pubsub-connectionstring'
          value: webPubSub.listKeys().primaryConnectionString
        }
      ]
      ingress: {
        external: true
        targetPort: containerPort
        transport: 'auto'
        allowInsecure: false
        traffic: [
          {
            weight: 100
            latestRevision: true
          }
        ]
      }
      dapr: {
        enabled: false
        appPort: containerPort
        appId: containerAppName
      }
    }
    template: {
      containers: [
        {
          image: 'pollstarinttestneuacr.azurecr.io/${containerAppName}:${containerVersion}'
          name: containerAppName
          resources: {
            cpu: json('0.25')
            memory: '0.5Gi'
          }
          env: [
            {
              name: 'Azure__StorageAccount'
              value: storageAccount.name
            }
            {
              name: 'Azure__StorageKey'
              secretRef: 'storage-account-secret'
            }
            {
              name: 'Azure__WebPubSub'
              secretRef: 'web-pubsub-connectionstring'
            }
            {
              name: 'Azure__PollStarHub'
              value: 'pollstar'
            }
            {
              name: 'APPLICATIONINSIGHTS_CONNECTION_STRING'
              secretRef: 'application-insights-connectionstring'
            }
          ]

        }
      ]
      scale: {
        minReplicas: 1
        maxReplicas: 6
        rules: [
          {
            name: 'http-rule'
            http: {
              metadata: {
                concurrentRequests: '30'
              }
            }
          }
        ]
      }
    }
  }
}
The bicep above will create a Container App. You can see that a System Assigned identity will be attached to the resource, meaning that I can apply role settings for this identity.
The Active Revision Mode is set to single. This means that only one revision can be active at a time. You could set this to multiple, to allow multiple revisions to be active. This allows you to graciously move from one revision to another.
Then three secrets are added to the Container App. These secrets contain information on how to connect to the storage account, application insights, and Azure Web PubSub.
Ingress is enabled, making the Container App reachable for network traffic. However, the external property is set to false. This makes the service only available for internal network traffic. In this case, that means inside the same Container Apps Environment.
Then you see DAPR is enabled. DAPR stands for Distributed Application Runtime. A future post will dig more into its capabilities, but for now… This allows the reverse proxy to communicate with this service.
Finally, I add a container with environment variables and some scaling settings. You must specify the resources to be reserved for the Container App. This basically means the amount of CPU and the amount of memory to be reserved. The container information also contains a reference to the Azure Container Registry to indicate where to pull the container image from. In this case, the scaling options tell that there should be at least one replica and at max six. Scaling is done by measuring HTTP traffic.
You could set the
minReplicasproperty to 0 allowing your Container App to scale back to 0. When no replicas are running, you don’t pay for the service so that could be an advantage. You do have to keep in mind that in this case, a Web API, you do suffer from warm-up times in case traffic comes in with 0 replicas available. That is why I defined a minimum of 1.
The next part discusses the reverse proxy project that redirects external traffic through the appropriate internal service using DAPR.
The CI/CD process
For CI/CD, I use GitHub Actions. These actions hook into pushes to the main branch. Once new code is pushed, it will compile the code into a container image and push that image to the Azure Container Registry.
GitVersion
I love semantic versioning. It is a way to control version numbers depending on the impact that your change makes. So if you implemented a breaking change, for example, you can ’tell’ the system you did, and is will automagically increase the major of your version number. I use GitVersion to determine a version number depending on all the changes made throughout the history of the code repository.
Please note that in some of these YAML snippets, you will find a reference to a parameter or variable like on line 5 in the example below (semver: blah blah). I added a space between the two curly braces because of a parser error in HUGO (the Framework I use to generate my static website). So if you copy and paste these snippets, remove the space between the curly braces (both open and close) for it to work properly.
jobs:
  versionize:
    runs-on: ubuntu-latest
    outputs:
      semver: ${ { steps.gitversion.outputs.MajorMinorPatch } }
    steps:
      - name: Checkout
        uses: actions/checkout@v2
        with:
          fetch-depth: 0
      - name: Install GitVersion
        uses: gittools/actions/gitversion/setup@v0.9.7
        with:
          versionSpec: "5.x"
      - name: Determine Version
        id: gitversion
        uses: gittools/actions/gitversion/execute@v0.9.7
        with:
          useConfigFile: true
First, an output value is defined. This makes that I can use the determined version number in the entire GitHub Actions workflow for as long as it runs. Then I checkout the repo to make the entire history of the repo available for GitVersion. Then I install GitVersion and finally determine the version number.
Compiling the code
The actual code compilation step will take place in a Dockerfile. My Dockerfile for the CI/CD process looks like this:
FROM mcr.microsoft.com/dotnet/sdk:6.0-alpine as build
WORKDIR /app
COPY . .
RUN dotnet restore
RUN dotnet publish -o /app/published-app

FROM mcr.microsoft.com/dotnet/aspnet:6.0-alpine as runtime
WORKDIR /app
COPY --from=build /app/published-app /app
ENTRYPOINT [ "dotnet", "/app/PollStar.Sessions.Api.dll" ]
Grab a build image, restore the dotnet packages, publish the API and run the API. Fairly straightforward. Then the following definition makes use of this Dockerfile and creates a docker image.
build:
  runs-on: ubuntu-latest
  needs: versionize
  steps:
    - uses: actions/checkout@v2
    - name: Build container images
      working-directory: src
      run: |
        docker build . --file Dockerfile --tag ${ { secrets.ACR_LOGIN_SERVER } }/$IMAGE_NAME:${ {needs.versionize.outputs.semver} }
        docker build . --file Dockerfile --tag ${ { secrets.ACR_LOGIN_SERVER } }/$IMAGE_NAME:latest
    - name: Login to ACR
      uses: azure/docker-login@v1
      with:
        login-server: ${ { secrets.ACR_LOGIN_SERVER } }
        username: ${ { secrets.ACR_USERNAME } }
        password: ${ { secrets.ACR_PASSWORD } }
    - name: Push container images
      working-directory: src
      run: |
        docker push ${ { secrets.ACR_LOGIN_SERVER } }/$IMAGE_NAME:${ {needs.versionize.outputs.semver} }
        docker push ${ { secrets.ACR_LOGIN_SERVER } }/$IMAGE_NAME:latest
The first action called Build container images executes a docker build command. Once for the version number determined by GitVersion and once for the latest version. I am not a fan of this latest thing by the way. Since I know the specific version I want to use throughout my entire pipeline, I think this version is way better to address than the latest.
Deploying infrastructure
Finally, I deploy the infrastructure using Bicep from within the workflow. I built the Bicep file earlier, which means it is now transpiled to a JSON ARM Template. I published that template as a workflow artifact.
infrastructure-incremental-test:
  needs: [build, publish-bicep, versionize]
  runs-on: ubuntu-latest
  steps:
    - name: Download Artifact
      uses: actions/download-artifact@v2
      with:
        name: bicep-templates
        path: ./infrastructure
    - name: Azure Login
      uses: azure/login@v1.4.0
      with:
        creds: ${ { secrets.AZURE_TEST } }
    - name: Deploy Infrastructure
      id: arm
      uses: Azure/cli@1.0.4
      with:
        inlineScript: az deployment sub create --name $IMAGE_NAME  --location northeurope --template-file ./infrastructure/main.json --parameters ./infrastructure/params.test.json --parameters containerVersion=${ {needs.versionize.outputs.semver} }
In the snippet above, you see that I download the workflow artifact, log in to Azure and create a new subscription deployment. I love these subscription deployments because they allow you to create Resource Groups. Then in Bicep, I call a different bicep file using a Bicep module, allowing me to switch scope from the Subscription to the Resource Group that I just created.
Note that I use the --parameters argument multiple times. This allows you to pass in more parameters. In this case, most of the parameter values come from an ARM Parameters File. The second argument only defines the version of the container to use.
The next post will elaborate more on the use of DAPR and the reverse proxy that takes advantage of DAPR to communicate with other services.
Last modified on 2022-10-03