So previously, I ran my blog relying on MiniBlog written and maintained by Mads Kristensen. The most impressive is that he hosts an online setup tool. Just run that tool, and a copy of miniblog will be installing on an environment within your Azure Subscription. Pretty awesome! The CMS also has a couple of drawbacks in my opinion. One of them is Open Live Writer (OLW). This is a tool, a sort of MS Word-ish word processor in which you write your blog entries. When done, you can publish them on your website. The basics work fine, however, OLW is not (or bad) maintained and annoying bugs are not going to be solved in the near future. Also, I’d like to write blogs in my favorite editor and (preferably) in a document format that is more supported than the file OLW produce.
And then came Jekyll
I’ve worked with Jekyll before and I like the tool a lot, however… It’s just not that intuitive. I’m running a couple of (static) websites like blogs and so, and I’m still using Jekyll there. However, for my own blog website, I was looking for a different solution.
And then came Jan
At 4DotNet we like to work together and talk a lot with each other. And so a had a little chat with my colleague Jan about HUGO. I looked into the product for a second or two and was amazed by the speed and ease you can create a new website from scratch, looking fairly good…
So I installed HUGO using Chocolatey, which basically installed a HUGO CLI on my machine. And then it’s really easy to start writing your website instantly. They have a huge amount of themes available. I like dark themes and found the solar theme good enough for me. So I installed the theme and started a new blog entry by typing:
hugo new name-of-my-blog.md
Oh Yesss, HUGO supports markdown! So I immediately followed that command up with
code .
And yes… I can now use Visual Studio Code to write my blog and pretty much do everything I want. In a nice file format (Markdown) and a nice editor (VS Code). Just to be sure, you don’t have to use VS Code, but you can.
A small history
Because I’m new in blogging about development stuff and only started a year back, there’s not much to convert and so I decided to copy and paste everything to markdown files and re-applied the styling. The only problem I had was finding links and images that I needed to copy over as well. But again, my blogging history is not that large so it was doable for me within an hour or two.
CI/CD - Work for me!
And now, I want my website to be updated after I add, change or remove a blog entry. I’m a developer using mostly Microsoft technologies, so I was really eager to host the website in Azure. Now Azure has basically a couple of flavors when it comes to hosting a static website. One, the easiest and fastest, is to create a storage account and use the static website feature inside that storage account. 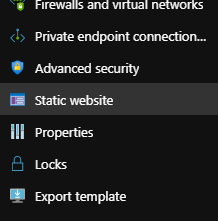 . When you enable that, you see some endpoints which can be used to navigate to, and a new container will be created in your Container storage called $web. Files inside that container are hosted as static files. Additionally, you can add a CDN Profile upon that and your website will be hosted for almost nothing AND extremely fast. I did this for our meetup platform website DotNet Friday.
This time, this service was not suitable for me, because of the simple fact that the CDN generates and adds this nice and free SSL certificate to your CDN Endpoint, but only for a single domain. Also (I believe) that CDN profiles don’t work well with second-level domain names (like hexmaster.nl, without the www prefix).
App Service with a service plan
In fact, what I did was creating a new App Service Plan, containing a Web App which also hosts static website fairly well. It’s not cheap (not as cheap as the storage account) and it’s not that fast (although it’s fast enough). BUT!! It handles multiple domain names, and you can install extra extra extra free certificates for all these names using Let’s Encrypt. Because I didn’t want to buy a load of expensive SSL certificates for a static website, I thought this was the move.
And what about the CI / CD?
This chapter is called CI/CD, but… Nothing yet on that… So Let’s start… To compile a HUGO project, you need to install an extension in Azure DevOps (Oh yes by the way… I assume you use Azure DevOps for your build / release pipelines). You can find that extension here.
Then I added a nice azure-pipeline.yml file to the root of my project, and added the following content to it :
trigger:
- master

pool:
vmImage: "vs2017-win2016"

steps:
- checkout: self
    displayName: "Checkout repository including submodules"
    submodules: true

- task: HugoTask@1
    displayName: "Generate Hugo site"
    inputs:
    destination: "$(Build.BinariesDirectory)"

- task: ArchiveFiles@2
    displayName: "Archive files for zip deploy"
    inputs:
    rootFolderOrFile: "$(Build.BinariesDirectory)"
    includeRootFolder: false
    archiveType: "zip"
    archiveFile: "$(Build.ArtifactStagingDirectory)/$(Build.BuildId).zip"
    replaceExistingArchive: true

- task: PublishPipelineArtifact@0
    displayName: "Public website artifact"
    inputs:
    artifactName: "website"
    targetPath: "$(Build.ArtifactStagingDirectory)"
 Note that a YAML file is very sensitive to white spaces, so use a good editor if you copy and paste this one because wrong white spaces break your build. As you can see, the build is pretty simple. I use the HUGO extension to compile a project, and write the output to the $(Build.BinariesDirectory) directory. From there I zip all files to the artifacts staging directory, which I then publish. If you commit this file, you can go to your Azure DevOps project and add a pipeline. Tell the system that the yaml (yml) file is already there and you’re done. You can instantly run a build of your website.
The release pipeline
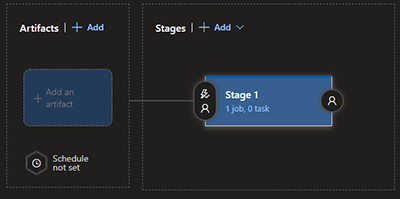
 The release is even easier. Make sure you have a connection between your Azure Subscription and Azure DevOps. Now (Let’s assume you’ve also already created a Web App in your Azure Portal) go to Pipelines > Releases in Azure DevOps and create a new pipeline. Select ‘Empty Job’ at the top of the opened blade.
Now click where it says ‘Add an artifact’ and select your build. Then click on the tiny flash icon and enable the continuous deployment trigger. This way, the release will trigger immediately after the build succeeds. Then click on ‘Stage 1’ and change the name to ‘Release to Azure’ in the blade that opens. Then click on the blue ‘1 job, 0 tasks’ text to open the tasks running for your release. You now see an empty window. This window contains all tasks that Azure DevOps must perform to release your website. Click on the + (plus) icon to add a new task. Navigate to the ‘Deploy’ tab and look for ‘Azure App Service deploy’.
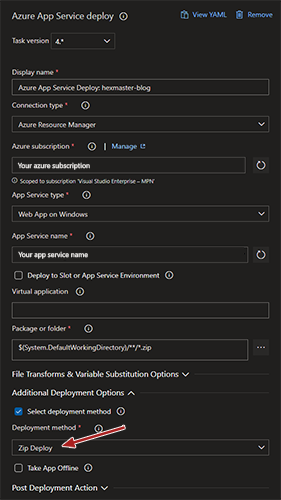
Note I set the ‘Deployment Method’ value to ‘Zip Deploy’. This is a fast and easy way to deploy a bunch of files to the target machine.
The release is even easier. Make sure you have a connection between your Azure Subscription and Azure DevOps. Now (Let’s assume you’ve also already created a Web App in your Azure Portal) go to Pipelines > Releases in Azure DevOps and create a new pipeline. Select ‘Empty Job’ at the top of the opened blade.
Now click where it says ‘Add an artifact’ and select your build. Then click on the tiny flash icon and enable the continuous deployment trigger. This way, the release will trigger immediately after the build succeeds. Then click on ‘Stage 1’ and change the name to ‘Release to Azure’ in the blade that opens. Then click on the blue ‘1 job, 0 tasks’ text to open the tasks running for your release. You now see an empty window. This window contains all tasks that Azure DevOps must perform to release your website. Click on the + (plus) icon to add a new task. Navigate to the ‘Deploy’ tab and look for ‘Azure App Service deploy’.
Note I set the ‘Deployment Method’ value to ‘Zip Deploy’. This is a fast and easy way to deploy a bunch of files to the target machine.
Last modified on 2019-12-16