Update 12/14/2022 - Both the text and the GitHub Actions workflow are slightly adjusted so the deployment works better and the workflow is more efficient.
With this article, I hope to take it a little bit further than other blogs do. There are a lot of articles that show Infrastructure as Code, App Deployments, or build strategies using CI/CD workflows, but not too many that tie all these techniques together. This post will take you from the beginning to the end. The focus of this article is the GitHub Actions workflow and assumes that you already have basic knowledge of GitHub Actions workflows and Infrastructure as Code for Azure (Bicep).
If you are looking for a good resource to learn more about Infrastructure as Code this book may be of good value to you.
The workflow
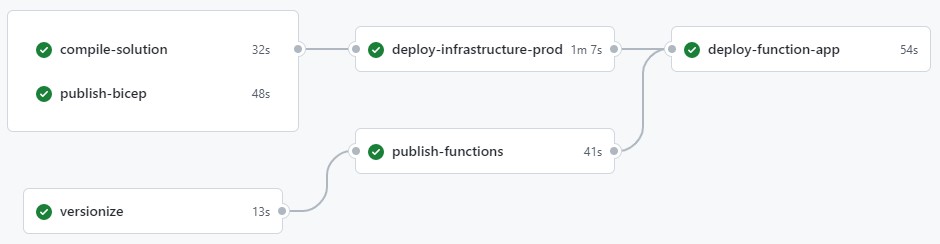 The workflow for this project contains a couple of jobs with dependencies on one another. This is to define to order in which the jobs must (or can) run.
The gray lines between jobs indicate dependencies. When a job depends on a different job, it will only run once the previous job ran successfully.
The workflow for this project contains a couple of jobs with dependencies on one another. This is to define to order in which the jobs must (or can) run.
The gray lines between jobs indicate dependencies. When a job depends on a different job, it will only run once the previous job ran successfully.
Starting the workflow
The snippet below are the first lines of my workflow template:
name: Function App Deployment
on:
  push:
    branches: [main]

env:
  FUNCTIONS_PATH: "Demo.FunctionsApp"
  FUNCTIONS_PROJECT: "Demo.FunctionsApp.csproj"
They set the name of the workflow, a trigger when to run the workflow, and some environment variables. In this example, the workflow will run when changes are pushed to the main branch.
The environment variables are used at a later stage to be able to publish the Azure Functions project.
Versionize
As you can see, the workflow starts with a versionize job. This is where I use GitVersion for semantic versioning, to generate a unique and predictable version number for my software system.
To determine a version number using semantic versioning, I use the following job:
versionize:
  runs-on: ubuntu-latest
  outputs:
    semver: ${{steps.gitversion.outputs.MajorMinorPatch}}
  steps:
    - name: Checkout
      uses: actions/checkout@v3
      with:
        fetch-depth: 0
    - name: Install GitVersion
      uses: gittools/actions/gitversion/setup@v0.9.15
      with:
        versionSpec: "5.x"
    - name: Determine Version
      id: gitversion
      uses: gittools/actions/gitversion/execute@v0.9.15
      with:
        useConfigFile: true
Versionize is the name of the job. Then there is one important line, the outputs. In the outputs section, a variable called semver is (let’s say) exported. This makes the semver variable available throughout the remainder of the workflow.
Note that the execute task of GitVersion relies on a configuration file. In this configuration file, you can configure how GitVersion should interpret your code base and generate a new version.
Compile Solution
In this job, I build the entire solution, run unit tests and publish test results. I can even set a minimum unit test code coverage percentage. This will make the job fail when the coverage of unit tests is below a certain percentage.
compile-solution:
  runs-on: ubuntu-latest
  steps:
    - uses: actions/checkout@v3
    - name: Setup .NET
      uses: actions/setup-dotnet@v3
      with:
        dotnet-version: 7.0.x
    - name: Restore dependencies
      run: dotnet restore ./src
    - name: Build
      run: dotnet build ./src --no-restore
    - name: Test
      run: dotnet test ./src --no-build --nologo --collect:"XPlat Code Coverage" --results-directory ./coverage
    - name: Code Coverage Report
      uses: irongut/CodeCoverageSummary@v1.3.0
      with:
        filename: coverage/**/coverage.cobertura.xml
        badge: true
        fail_below_min: false
        format: markdown
        hide_branch_rate: false
        hide_complexity: true
        indicators: true
        output: both
        thresholds: "60 80"
The snippet above restores all .NET packages, builds the entire solution, and executes unit tests. Finally, a code coverage report is generated. Note that the fail_below_min is now set to false. When true, the job will fail if the amount of lines tested is lower than (in this case) 60%. The `thresholds parameter allows you to change these values, where the first number is the minimum and the second value is the target.
Publish Bicep
Bicep is not a language that Azure (or the ARM specifically) will understand. Under the hood, Bicep will always be transpiled to an ARM Template (JSON) before the ARM interprets the file. To take more control over this process (and determine errors on the way) I always think it is a good idea to transpile Bicep templates in your pipeline and publish the JSON products as artifacts.
publish-bicep:
runs-on: ubuntu-latest
steps:
    - uses: actions/checkout@v3
    - name: Compile infrastructure
    uses: Azure/cli@v1
    with:
        inlineScript: az bicep build --file ./infrastructure/main.bicep
    - name: Publish Artifact
    uses: actions/upload-artifact@v3
    with:
        name: bicep-templates
        path: infrastructure/*.json
In this job, the Publish Artifact step is important. Publishing (or uploading) and artifact, allows you to store files in a central store for later use. This is very powerful if you have multiple deployment environments, like development, test, acceptance, and production. It allows you to build (compile) your software only once, to deploy this compiled system (the artifact) to one or more locations.
[
Publish Functions
The build functions job runs a dotnet publish on the Azure Functions project, outputting the files required to run the functions project in the cloud. Unlike the compile-solution job, this job focuses on the functions project, while the compile-solution job compiles the entire solution and runs all the test projects.
publish-functions:
  runs-on: ubuntu-latest
  needs: versionize
  steps:
    - uses: actions/checkout@v3
    - uses: actions/setup-dotnet@v3
      with:
        dotnet-version: "7.0.x"
    - name: Restore packages
      working-directory: src
      run: dotnet restore
    - name: Publish functions app
      working-directory: src
      run: dotnet publish $FUNCTIONS_PATH/$FUNCTIONS_PROJECT -c Release --no-restore -o functionsout /p:Version=${{needs.versionize.outputs.semver}}
    - name: Upload functions artifact
      uses: actions/upload-artifact@v3
      with:
        name: player-functions
        path: src/functionsout/*
The dotnet publish task outputs to a specific folder (functionsout). The content of this folder is published as a workflow artifact so it can be used at a later stage in the workflow.
Deploying the cloud infrastructure
This project uses Bicep to describe the desired infrastructure. It is a domain-specific language that transpiles to an ARM Template. An ARM Template (ARM stands for Azure Resource Manager) is Azure’s native way of describing infrastructure. Since the Bicep file is already transpiled to an ARM Template and published as a workflow artifact, we can now use this ARM Template by simply downloading the artifact.
deploy-infrastructure-prod:
  runs-on: ubuntu-latest
  needs: [publish-bicep, compile-solution]
  outputs:
    targetResourceGroupName: ${{ steps.armdeployprod.outputs.targetResourceGroupName }}
    functionResourceName: ${{ steps.armdeployprod.outputs.functionResourceName }}
  steps:
    - uses: actions/download-artifact@v3
      with:
        name: bicep-templates
    - uses: azure/login@v1
      name: Azure Login
      with:
        creds: ${{secrets.AZURE_PROD}}
    - uses: azure/arm-deploy@v1
      id: armdeployprod
      name: Deploy infrastructure
      with:
        scope: subscription
        region: northeurope
        template: main.json
        parameters: main.prod.json
        deploymentName: FunctionsDemoProd
Note that again, there are two output parameters defined in the outputs section. The values of these parameters come from the step with id armdeployprod and refer to the output parameters of the ARM Template.
What happens here is that the ARM Template generated a unique name for the Azure Functions resource in the Azure Cloud. The next job in this workflow is going to need the name of this Function App resource (as well as the Resource Group it is organized in) to allow for the deployment of the Function App. Outputting the values from the ARM Template allows for the usage of these values for the remainder of this GitHub Actions workflow. The upcoming deploy-function-app job refers to these values to be able to actually deploy the function app.
Just before the infrastructure is deployed, you see a step that logs in to Azure. This is because the deployment of resources requires a valid ‘user’ or entity with enough permissions to do so. In this case, I used a service principal. I just read a blog last week by Oscar van Tol who explains a better way to log in to Azure from GitHub Actions (without using passwords).
Then the actual infrastructure deployment takes place. As you can see it targets the subscription scope. I always like to target the subscription scope and have Bicep create the target Resource Group for me. Then I will use a module in Bicep, to deploy the infrastructure actually needed for the app.
Function App deployment
Finally, the Function App itself will be deployed. You can see in the needs property, that this job depends on the deploy-infrastructure-prod job. If you want to use the output parameters of a certain job, you need to add this dependency.
deploy-function-app:
  runs-on: ubuntu-latest
  needs: [publish-functions, deploy-infrastructure-prod]
  steps:
    - uses: actions/download-artifact@v3
      with:
        name: player-functions
        path: function
    - uses: azure/login@v1
      with:
        creds: ${{secrets.AZURE_PROD}}
    - name: Deploy Azure Functions app
      uses: Azure/functions-action@v1
      with:
        app-name: ${{needs.deploy-infrastructure-prod.outputs.functionResourceName}}
        package: function
Then again, Azure Login is used to log in to Azure and identify ourselves. The the workflow artifact for the published Azure Function App is downloaded. This basically means that to output of the dotnet publish task in the publish-functions job of this workflow is now available again. Finally, the Azure/functions-action@v1 deploys our function files to the cloud environment.
Conclusion
It takes some to tie all the knots together and come to a fully working GitHub Actions workflow. I do promise, especially in professional environments, having your CI/CD workflows set up in an automated fashion is a must. Getting there and setting everything up may be a struggle sometimes, but once you get the hang of it, you will truly enjoy each and every time your workflow (or pipeline) runs successfully. The complete source code of this project can be found right here.
To get everything up and running, you must have a GitHub repo where you save the project code. Generate a service principal (with contribute permissions) and store its properties in the secrets tab in the settings of your GitHub repo. Name these secrets AZURE_PROD (all capitals) and you’re good to go!
Last modified on 2022-12-12