I have been working with Azure services for quite some time. I think I have quite some experience with services commonly used for Web development, including networking and some security stuff. What I don’t know, is containers. I think the native Azure services are going to remain for quite some time, the Azure Web App service is extremely underestimated. It is powerful enough to understand whatever you throw at it and run it. Despite all that, I think containers are going to be the future, one way or another. Because I missed a couple of container boats I decided to not miss this one and dig into the world of Azure Container Apps.
What are Azure Container Apps?
Well, far under the hood… you run this magic thing called Kubernetes. Kubernetes (of k8s in short) is a set of tools that orchestrate your container environment. The downside of k8s is that it has so many knobs and switches, that it becomes complicated to set up and maintain. Azure Kubernetes Service (AKS) is an abstraction layer on top of k8s with some clever tools added so it integrates nicely in your Azure environment.
You can see Azure Container Apps (ACA) as another abstraction layer on top of that. This ACA abstraction layer manages all those knobs and switches for you and thereby removes a lot of complexity.
Azure Container Apps Environments
Before you create an Azure Container App, you need a so-called Environment. You can add multiple ACAs to a single environment and you are recommended to do so if services have some cohesion. You can configure a custom Virtual Network for your environment. If you don’t, the environment will create a network for you and run all the apps within that network. It is only recommended to create a new ACA Environment when apps never share the same compute resources (and never communicate with each other using DAPR).
Adding an App
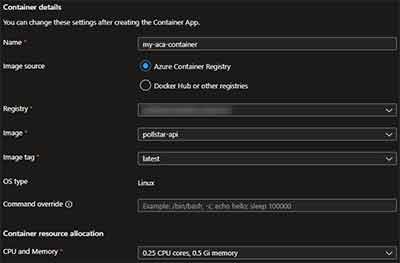
Now when your Container App Environment is created you can start adding containers. Containers have three important settings that you must configure before you can create the container. First, you must select an ACA Environment to add the new container to that specific environment. Then you must specify where to pull the container image from. This can be an ACR (Azure Container Registry) instance, an image from the Docker Hub, or any other container registry. Finally, you need to specify resource allocation. This means that you select a certain amount of computing power and a certain amount of memory.
 Once you have specified all this, you can go ahead and create your Container App. Once created, it will pull the specified container image from the container registry and try to run it.
Routing traffic to your container
OK Nice, now your container is up and running. But unfortunately, you happened to deploy a Web API and requests to the service don’t return the expected response. Well, this is because routing traffic to your ACA is not enabled (yet). To route traffic to your ACA, you need to configure a reverse proxy and in the world of containers, a reverse proxy is called Ingress (or an Ingress Controller).
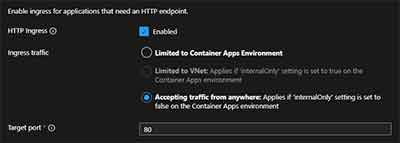
 Go to the details of your container and find the Ingress blade. You can enable Ingress by clicking the checkmark. Select “Accept traffic from anywhere” to allow traffic from the public internet. The target port is the port on your container to target the traffic to. In this case, my container exposes port 80 (HTTP), so the target port is set to 80.
Last modified on 2022-08-04

