So as promised, I’m back with part 2 of the Valet Key design pattern blog. In part 1 I showed how the design pattern works, how it works on Azure and how to implement the pattern using ASP.NET Core. In this second part, I’ll show how to implement the client solution. I chose to use an Angular client. Not only because I like Angular, also because it’s nice to have a javascript implementation directly uploading into the cloud.
Let’s briefly resume part 1
I wrote a backend system, that creates a Secure Access Signature (or SAS). That SAS is suitable for a specific endpoint. This endpoint is represents a BLOB in Azure Storage. The SAS grants write-access to that endpoint. The backend system returns the endpoint and the corresponding SAS.
Make use of the Azure Blob Storage javascript
Microsoft distributes a package of javascript files that enable you to communicate with an Azure Storage account. You can download that package at https://aka.ms/downloadazurestoragejs. I used version 2.10.103 in my project. If you unzip the package, you actually only need the azure-storage.blob.js in the bundle folder.
Next up, Angular
Now you need to create an angular project. If you don’t feel like creating this project all by yourself, you may want to take a peek at my sample project on Github.
To create an Angular project, download and install NodeJS 10 and open a console window.
When I create an Angular project, I like to configure SASS as default style type, and for this project let’s disable testing. Also I added the Angular router which is a huge overkill for this project.
npm i @angular/cli -g
ng new upload-example --styles=scss --skip-tests --routing=true
cd upload-example
ng serve –o
You just installed the Angular CLI (globally), created a new Angular project. A new angular project will be created in a folder with the same name, so we navigate to the newly created project and start serving it with a development server. The -o parameter opens the project in your default browser when the compiler is done and the dev server is started.
Now in the assets folder, create a new folder ‘scripts’ and add the azure-storage.blob.js file. Then make sure Angular outputs that script by adding it to angular.json
"scripts": ["src/assets/scripts/azure-storage.blob.js"]
Then replace all HTML in the app.component.html file with <router-outlet></router-outlet>.
Adding services
OK, now the hard part. I found this clever guy Stuart who had a great implementation of uploading files to blob storage. I extended his services to make a call to the backend prior to uploading, in order to get a valid endpoint and SAS. So in the app folder, I created a new folder services and added azure-storage.ts and blob-storage.service.ts.
Coming home
Then I added a module and component for the landing page:
ng g module pages/home
ng g component pages/home/home
This generates a Home Module and a Home Component in it. Be sure to import the HomeModule in your app.module.ts, else Angular will not be able to show the component.
The home.component.ts contains some methods that allow the upload to happen. But first, let’s add a file select box to the home.component.html file. Note the (change) event passing changes to the home component.
onFileChange(event: any): void {
    this.filesSelected = true;
    this.uploadProgress$ = from(event.target.files as FileList).pipe(
        map(file => this.uploadFile(file)),
        combineAll()
    );
}
As you can see, the event handler loops through all files selected and fires this.uploadFile() passing the selected file. The uploadFile() method accepts the file and requests an endpoint and a SAS from our backend system.
uploadFile(file: File): Observable<IUploadProgress> {
return this.blobStorage
    .aquireSasToken(file.name)
    .pipe(
    switchMap((e: ISasToken) =>
        this.blobStorage
        .uploadToBlobStorage(e, file)
        .pipe(map(progress => this.mapProgress(file, progress)))
    ));
}
The service contains a method aquireSasToken() which calls our backend. The backend uses a valid Azure Storage Account connection string to create a SAS for a certain endpoint and returns this information. Then the uploadToBlobStorage() method is called, which uses the SAS to determine where to upload to, and also accepts the file. The mapProgress() keeps track of the upload progress and shows it in percentages.
One final note
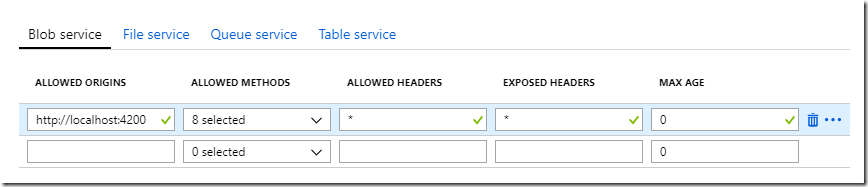 valet-key-corsJust like your ASP.NET Web Application, an Azure Storage Account is protected with CORS. So in order to upload blobs using a JavaScript system like Angular you need set some CORS rules in Azure. This Angular project runs on localhost port 4200, so I added this origin, accepting all methods and all headers. Note these settings are not recommended in production environments.
Last modified on 2019-06-06