So it’s 2020 now… One of my colleagues replied in a tweet by a Dutch telecom provider. They tweeted the app was down for a while because they’re updating the thing. Again, it’s 2020 now. Downtime is a thing from the past. The Microsoft Azure cloud and Microsoft DevOps allow you to create premium high performant apps and deliver services that allow you to maintain that app with minimal downtime. While your app is growing, so is it’s technical architecture. This means that you’re not done with automagically deploying your stuff to the cloud. You must also maintain that cloud architecture. Azure provides ARM templates as a tool to do just that.
So what are ARM Templates?
First, the abbreviation ARM stands for Azure Resource Management. All services in Azure that you can possibly deploy, is called a resource. An ARM template is basically a file, in JSON format, that describes your cloud architecture. This file represents a ‘desired state’, which means that if you deploy it, Azure will do what’s needed to come to the state you described. You can deploy these templates in two ways, complete and incremental. Complete describes your complete set of resources. If more resources exist, they will be removed. Incremental means that you can write your templates as changes to the previous environment. Resources not described in the JSON file will be left alone.
Parameters and Variables
An ARM template contains (or can contain) parameters and variables. The difference between the two is that variables are ’local’ and will not change for example depending on environments. While parameters can be ‘inserted’ from an external JSON file (or as an array for example if you like). When you’re developing a professional product, you’d probably like to have a test and/or acceptance environment before something is deployed into production. Now when your product is (for example) a website, you’d want to provision a ‘Web App’ service in Azure, which name must be unique. So in case, your web app name is ‘mywebsite’, you’ll run into problems when you deploy this in different environments. This means you may want to change the name, or prefix is for example so the name becomes unique for every environment. So let’s write our first little piece of ARM JSON and define a parameter for the environment we’re installing on:
  "parameters": {
    "environment": {
      "defaultValue": "prod",
      "type": "String",
      "allowedValues": ["test", "acc", "prod"]
    }
  }
OK, we’ve now defined a parameter so that we can define the environment when the script runs and provided a default value ‘prod’. Now let’s create a variable containing the name of our website:
  "variables": {
    "website_name": "[concat(parameters('product_prefix'), '-mywebsite')]"
  }
Now the easiest way to control this, it to create parameter files. One for each environment. So in case you have a test and acceptance environment, you’ll create three files ‘azuredeploy.test.parameters.json’, ‘azuredeploy.acc.parameters.json’ and ‘azuredeploy.prod.parameters.json’. The test parameters file for example, looks like this:
{
  "$schema": "https://schema.management.azure.com/schemas/2015-01-01/deploymentParameters.json#",
  "contentVersion": "1.0.0.0",
  "parameters": {
    "environment": {
      "value": "test"
    }
  }
}
Now when running the file, you specify a parameters file, and (thereby) define which environment to provision and install your stuff on. Cool right?
== PRO TIP ==
Although I’m not the most experienced guy when it comes to ARM templates, I found that creating your script based on variables only is WAY easier than mixing parameters and variables. So basically what I do now, is when I create a new parameter, I also immediately create a new variable with the same name, which imports the parameter value. When you’re creating larger templates, you don’t want to scroll up and down your file constantly to find out is a certain value was a parameter or a variable. Now you can always safely use a variable.
Dependencies and Relations
One of the difficult parts of running ARM templates is that you must know the environment you’re installing on pretty well. For example, when you want to run a Web App on Azure, you must also create an App Service Plan. And when you’re running a Functions App in ‘from package’ mode, you also need a storage account. Finding these requirements are fairly hard, so let’s find them out the easy way…
Exporting a template
All azure resources now have the option to export their template. And even, when you select a resource group, you can select a couple of resources and have Azure generate a template for all selected resources. Also, you can have Azure exporting the entire resource group. Using this export mechanism is a fast and easy way to get going with your template.
Make provisioning a resource dependant
The template JSON file contains an array called resources. In this resources is a list of all resources you want to provision. Basically, this is your actual template. All resources have a type, name and apiVersion property. All other properties depend on the type of resource. Also, you can define an array of dependsOn resource. This means, that deploying the resource, depends on another resource. This makes Azure wait to provision the resource, until all resources in the dependsOn array, are successfully provisioned. So the example mentioned above, a Web App requires an App Service Plan, so a template with these two would look like this:
({
  "type": "Microsoft.Web/serverfarms",
  "apiVersion": "2018-02-01",
  "name": "[variables('app_service_plan_name')]",
  "location": "[resourceGroup().location]"
  //...
},
{
  "type": "Microsoft.Web/sites",
  "apiVersion": "2018-11-01",
  "name": "[variables('web_app_name')]",
  "location": "[resourceGroup().location]",
  "dependsOn": [
    "[resourceId('Microsoft.Web/serverfarms', variables('app_service_plan_name'))]"
  ]
  //...
})
== PRO TIP ==
It’s a good practice to group all Azure Resources in a resource group in a convenient way. This allows you to control those resources easier, but also can provide good insight in (for example) the costs of an entire system. If you use the [resourceGroup().location] location value for your resources, they will be automatically provisioned in the same location (Azure Data Center) as your resource group (which is often what you want).
Let’s go real-life
So a lot of times, I see some examples of ARM templates and or solutions that are partially complete or just don’t describe that small step beyond the default I’m looking for. So what we’re going to do I create a real-life backend (serverless) app in Azure DevOps, create a multi-stage deployment all from scratch.
We’re going to provide the following resources:
- A Storage Account
- A Key Vault
- Application Insights
- An App Service Plan
- A Functions App
But first things first, let’s create a blank solution file and open that in Visual Studio. Once started, add a new Azure Functions project. Make sure you have the latest version of VS.NET installed as we’re (of course) going for a V3 Azure Functions project. Name it whatever you like, I called mine MyDemo.Functions. Now add a new function to the project with an HTTP trigger. Make sure you set the Authorization level to Anonymous. Click ‘Create’ and wait for your project to be generated. Now just because I think it’s neat I created a folder inside the project called Functions and I dragged the function inside that folder. I updated the namespaces and renamed the file to HelloWorldFunction.cs and I changed the function like so:
namespace MyDemo.Functions.Functions
{
    public static class HelloWorldFunction
    {
        [FunctionName("HelloWorldFunction")]
        public static async Task<IActionResult> Run(
            [HttpTrigger(AuthorizationLevel.Anonymous, "get", "post", Route = "hello")]
            HttpRequest req)
        {
            var name = "World";
            return new OkObjectResult($"Hello, {name}");
        }
    }
}
Now when you run this locally, you can open a browser and navigate to http://localhost:7071/api/hello and see this nice ‘Hello, World’ greeting. This means your function works, now it’s time to deploy it to Azure.
Add a resource deployment project
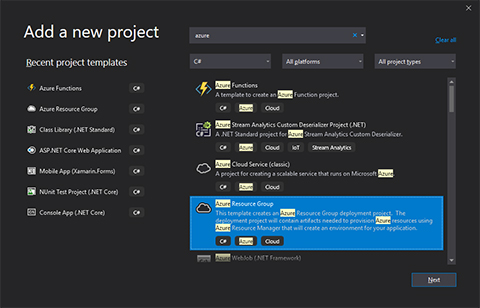 Once you’re satisfied with your solution, and who isn’t with this nice Hello World feature, you right-click the solution and add a new project. Search for ‘Azure’ and you will find a project type called ‘Azure Resource Group’. I named it ‘MyDemo.Deployments’. You can now choose a template and I chose a blank template there. Now when you inspect that project you’ll see two JSON files and a PowerShell script. We’re not going to use that PowerShell, so you can remove it right away (or ignore it if you like). We’re actually looking for the
 azuredeploy.json and the azuredeploy.parameters.json.
Now it’s time to think of some parameters and variables so we can provide everything we want on Azure.
"parameters": {
  "product_prefix": {
    "defaultValue": "hello",
    "type": "String"
  },
  "environment": {
    "defaultValue": "prod",
    "type": "String",
    "allowedValues": [
      "prod",
      "acc",
      "test"
    ]
  },
  "storage_account_name": {
    "defaultValue": "storage",
    "type": "String"
  },
  "functions_app_name": {
    "defaultValue": "functions",
    "type": "String"
  },
  "app_service_plan_name": {
    "defaultValue": "serviceplan",
    "type": "String"
  },
  "application_insights_name": {
    "defaultValue": "insights",
    "type": "String"
  },
  "keyvault_name": {
    "defaultValue": "keyvault",
    "type": "String"
  },
  "tenantId": {
    "type": "string",
    "defaultValue": "[subscription().tenantId]",
    "metadata": {
      "description":
        "Specifies the Azure Active Directory tenant ID that should be used for authenticating requests to the key vault. Get it by using Get-AzSubscription cmdlet."
    }
  }
}
And now it’s time to define some variables, so we can finally start building our template. As in the pro-tip #1, i’m going to only use variables in my script, so everything I need from parameters it going to be represented in variables as well.
"variables": {
  "keyvault_name": "[concat(parameters('environment'), parameters('product_prefix'), parameters('keyvault_name'))]",
  "storage_account_name":
    "[concat(parameters('environment'), parameters('product_prefix'), parameters('storage_account_name'))]",
  "app_service_plan_name":
    "[concat(parameters('environment'), parameters('product_prefix'), parameters('app_service_plan_name'))]",
  "functions_app_name":
    "[concat(parameters('environment'), parameters('product_prefix'), parameters('functions_app_name'))]",
  "application_insights_name":
    "[concat(parameters('environment'), parameters('product_prefix'), parameters('functions_app_name'))]",
  "secret_storage_connection": "storage-connection-string",
  "secret_instrumentation_key": "appinsight-instrumentation-key",
  "storage_share_name": "share",
  "storage_account_id": "[resourceId('Microsoft.Storage/storageAccounts', variables('storage_account_name'))]"
}
As you can see, I added some extra values which I will explain later. But if you inspect the variables, you’ll immediately see the power of these variables as you can easily combine values from parameters and other variables. Take some time to get familiar with all the braces and brackets. I created a product prefix to indicate the product we’re working on, with a value of ‘hellowrld’. By combining this with the environment name and the resource type name, we end up with unique names for each environment that also actually make sense:
- hellowrld-test-keyvault
- hellowrld-test-storage
- hellowrld-test-serviceplan
- and so on
Now it’s time to work the template
OK, so now we’ve got parameters and variables under control, let’s work on the template and get that working. First, you need to know that services in Azure depend upon each other. For example, if you write this nice Azure Functions application in Visual Studio and you deploy it, you actually need a storage account, an App Service Plan, and a Functions App. Because of this relations, I think it’s a good idea to write the template more or less in the order stuff is going to provision on Azure. This is not mandatory, but I think it’s easier to read the template and to find problems. So the first part of this deployment will be the storage account. This storage account also provisions child resources, a BLOB service, and a file service. Inside that file service, a share will be created which is going to be used by our Functions App later on.
{
  "type": "Microsoft.Storage/storageAccounts",
  "apiVersion": "2019-06-01",
  "name": "[variables('storage_account_name')]",
  "location": "[resourceGroup().location]",
  "sku": {
    "name": "Standard_LRS",
    "tier": "Standard"
  },
  "kind": "Storage",
  "properties": {
    "networkAcls": {
      "bypass": "AzureServices",
      "virtualNetworkRules": [],
      "ipRules": [],
      "defaultAction": "Allow"
    },
    "supportsHttpsTrafficOnly": true,
    "encryption": {
      "services": {
        "file": {
          "keyType": "Account",
          "enabled": true
        },
        "blob": {
          "keyType": "Account",
          "enabled": true
        }
      },
      "keySource": "Microsoft.Storage"
    }
  },
  "resources": [
    {
      "type": "blobServices",
      "apiVersion": "2019-06-01",
      "name": "/default",
      "dependsOn": [
        "[resourceId('Microsoft.Storage/storageAccounts', variables('storage_account_name'))]"
      ],
      "sku": {
        "name": "Standard_LRS"
      },
      "properties": {
        "cors": {
          "corsRules": []
        },
        "deleteRetentionPolicy": {
          "enabled": false
        }
      }
    },
    {
      "type": "fileServices",
      "apiVersion": "2019-06-01",
      "name": "/default",
      "dependsOn": [
        "[resourceId('Microsoft.Storage/storageAccounts', variables('storage_account_name'))]"
      ],
      "sku": {
        "name": "Standard_LRS"
      },
      "properties": {
        "cors": {
          "corsRules": []
        }
      },
      "resources": [
        {
          "type": "shares",
          "apiVersion": "2019-06-01",
          "name": "[variables('storage_share_name')]",
          "dependsOn": [
            "[resourceId('Microsoft.Storage/storageAccounts/fileServices', variables('storage_account_name'), 'default')]"
          ],
          "properties": {
            "shareQuota": 5120
          }
        }
      ]
    }
  ]
}
You’re allowed to put all the nested resources outside its parent resource and define it as an entire ‘independent’ resource. However, I think it’s more convenient and easy to read if you nest stuff that belongs to each other. Note that all the nested resources do contain a dependsOn, so the actual deployment of these resources do wait for their parent to complete. Next up is Application Insights, which is really straight forward:
{
  "type": "microsoft.insights/components",
  "apiVersion": "2015-05-01",
  "name": "[variables('application_insights_name')]",
  "location": "[resourceGroup().location]",
  "kind": "web",
  "properties": {
    "Application_Type": "web",
    "Flow_Type": "Redfield",
    "Request_Source": "AppServiceEnablementCreate"
  }
}
Then the App Service Plan, which is actually called a serverfarm in Azure. This App Service Plan is created of type functionapp because it will host our Function App later on. The SKU properties are set so they create an App Service Plan billed using a Consumption Plan.
{
  "type": "Microsoft.Web/serverfarms",
  "apiVersion": "2018-02-01",
  "name": "[variables('app_service_plan_name')]",
  "location": "[resourceGroup().location]",
  "sku": {
    "name": "Y1",
    "tier": "Dynamic",
    "size": "Y1",
    "family": "Y",
    "capacity": 0
  },
  "kind": "functionapp",
  "properties": {
    "perSiteScaling": false,
    "maximumElasticWorkerCount": 1,
    "isSpot": false,
    "reserved": false,
    "isXenon": false,
    "hyperV": false,
    "targetWorkerCount": 0,
    "targetWorkerSizeId": 0
  }
}
I realize there’s a lot of JSON in this post, but I really like to complete the entire post so everything works for everyone reading it. Now next up, is going to be the hard part. We’re now going to create the function app, and also configure the function app. However, the Function App configuration will use Key Vault References. This means the Functions App system assigned identity must be turned on, and the identity must have permissions in the key vault. So the workflow is like this:
- Create the Function App and turn the System Assigned Identity on.
- Create a key vault and grant permissions to the Function App’s identity
- Create secrets in the key vault
- Configure the web app to use key vault references
I’m going to skip this JSON because it’s just too large and doesn’t add value to the blog post. The entire source including deployment pipelines and arm templates will be available anyway.
Deploy the product
So now that the ARM template is done, let’s focus on the deployment of the app itself. Do do that, we’re going to use the Azure DevOps multi-stage deployment. To allow you to use multi-stage pipelines, you need to enable this feature in Azure DevOps. Log in to Azure DevOps and click on the icon next to your profile picture (top right of your screen). Click ‘Preview Features’ and enable ‘Multi-stage pipelines’.
Multi-stage pipelines allow you to build your system, provision it’s infrastructure and deploys to that infrastructure in a single pipeline. So one stage could be to build your system. This build would result in a pipeline artifact. This artifact can be used in a second stage which could be a deployment to test. The next stage could be a deployment to acceptance, then staging and production for example. This example doesn’t cover all these stages, but trust me, when you have the build and deployment in place, understanding the deployment to different environments is peanuts.
Let’s get Azure DevOps ready
There are a couple of things you need to do in Azure and in Azure DevOps to get everything going. On your Azure account, create a Resource Group. Name it whatever you want. For this example, I named mine ‘Target’. You may want to use a more descriptive name maybe. Now go back to Azure DevOps and open your project. On the bottom left corner, you’ll see a link called ‘Project Settings’. Click that link, next click ‘Service Connections’. We need to create a new service connection. A service connection allows Azure DevOps to communicate with Azure. We want that because we want DevOps to provision stuff for us, and then deploy to that.
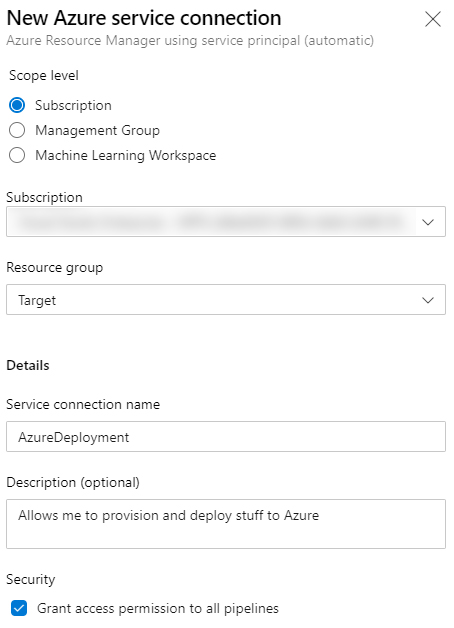 Click the ‘New service connection’ button, and choose ‘Azure Resource Manager’ and next. Then choose ‘Service Principal (recommended)’. You can now configure your Service Connection. Your known Azure Subscriptions will show in a dropdown box. Select the desired subscription, then select the resource group you just created. Next, give your service connection a decent name, I named it AzureDeployment for this demo, but again, choose a nice descriptive name here.
Now as I already mentioned, you can use multi-stage pipelines to build and deploy stuff to your test, acceptance, production and whatever environment you need. These environments need to be created in DevOps as well. Again, this demo only deploys to Production. So let’s expand the Pipelines section in DevOps and click Environments. Add a new environment called ‘Production’, give it a nice description if you like and choose None in the resource selection.
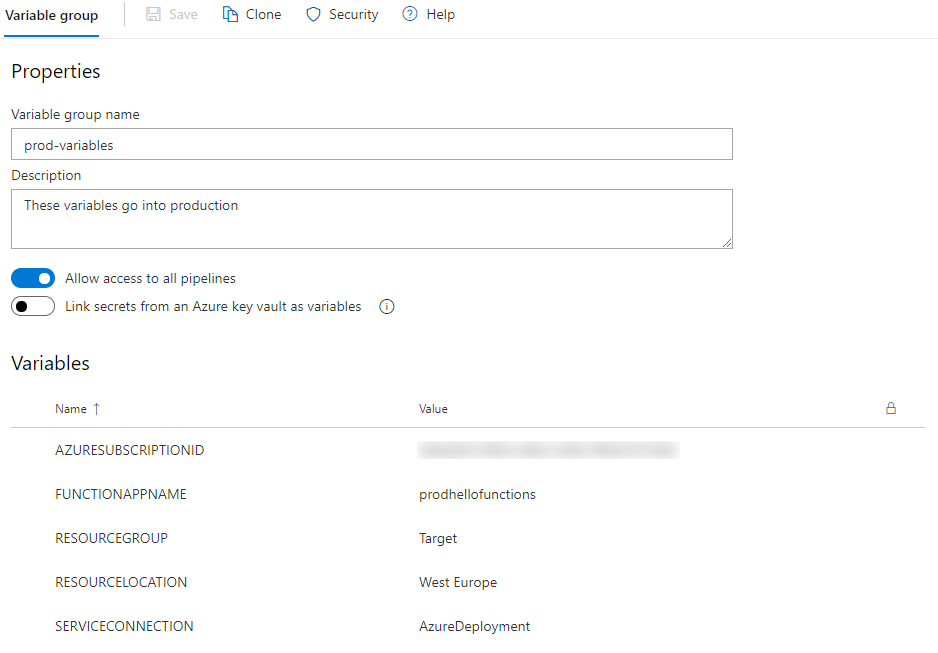
OK next up, a Variable Group. In the same ‘pipelines’ section, go to Library and create a new ‘Variable Group’. You are going to log in to Azure using a Service Connection, and you do need to pass an Azure Subscription ID and once your deployment evolves over time, more and more information is required. Information that’s probably (partly) secret. Variable groups are an excellent way of storing those secrets. You can even reference Azure KeyVault if you like. For now, we’re just going to store the information as readable text, just to make sure we got everything going. Now click the Add Variable Group button and give your group a proper name. I named mine ‘prod-variables’, and I added a couple of variables. But first, make sure the ‘Allow access to all pipelines’ is on. This (yes, it’s in the name), allows our pipeline to access the values from the variables. Then we need to add 5 Variables: AZURESUBSCRIPTIONID, FUNCTIONAPPNAME, RESOURCEGROUP, RESOURCELOCATION and SERVICECONNECTION.
 Then we’re going to add values. Set the
 AZURESUBSCRIPTIONID to the ID of your Azure Subscription, which is a GUID. The FUNCTIONAPPNAME should be set to the same as the name of the Functions App you create in the ARM template. Set the RESOURCEGROUP to the name of your resource group, in my example this would be ‘Target’. Set the RESOURCELOCATION to the Azure Location (that is the data center location) of your resource group. Mine is at ‘West Europe’. And finally set SERVICECONNECTION to the name of the service connection you created in the previous step.
Awesome, you’re now good to go and create an Azure Pipeline. Everything is in place and you’re now up to the last bit. The pipeline is (as the ARM template) a huge definition file, so I created a gist here, open it in a new browser and I’ll walk you thought.
The first part, trigger tells the pipeline to trigger when a commit has been done on the master branch. Then the variables, you see that I reference a group (called ‘prod-variables’), you need to change this to the name of your variable group. Then there’s a section called stages. This is where we define the different stages of our pipeline. So for this example, only two stages. Build and Deploy to Production. Let’s dive into the Build step. The first step is to copy files from a \deployments folder to a publish_output folder. It copies all .json files. This step copies the ARM Template, and the ARM Template Parameter files to the Artifact Staging Directory. In the next task, our functions app is built in release mode. The next step grabs everything that’s built (the files we need to deploy) and stores them also in the Artifact Staging Directory in a .zip format. The final publish steps publish both the ARM template files and the .zip file as a pipeline artifact. This way, we can use it in stages further on.
The second part, which starts at - stage: Deploy is the part where we’re going to deploy stuff. You can see the environment is set to ‘production’, this is the name of the environment as you created it in Azure DevOps. Then the first task is an Azure Resource Manager Template Deployment task, which actually runs our ARM template. You can see I use csmFile $(Pipeline.Workspace)\deployments\azuredeploy.json. This is actually one of the artifacts published in the Build stage. I set this deploymentMode to ‘Incremental’. This is important because if you’re migrating stuff, you want the new situation to be operational before you break down the old situation. The Incremental deployment mode only adds new stuff or changes existing stuff as long as it’s defined in the ARM template.
The next task is the actual deployment of the system. I’m using deploymentMethod ‘auto’ here. Because I’m using a .zip file, the system will automatically start a zip deployment for me.
The last task is again an ARM template task. But… in this case, it’s deploymentMode is set to ‘Complete’. This means that in case I provisioned stuff in Azure previously, and it’s not in my ARM template, it will be removed.
And there you go!! There is your complete very own multi-stage Azure DevOps pipeline in YAML, using an ARM template to provision your Azure environment and deploy directly to it. You can run this demo yourself by cloning (or downloading) my demo project on GitHub. Please, PLEASE let me know what you think and tell me if you see improvements for this post.
Last modified on 2020-03-19