Do you want to get started with Azure Container Apps? Read on! So I heard recently that there are (still) a lot of folks that want to get started with Azure Container Apps, but doing so is quite a gap to bridge. With this post, I hopefully simplify this process allowing more users to take advantage of Azure Container Apps (ACA).
Why???
The first question that may arise is why you would want to move to ACA instead of your current hosting solution. Well, upfront (and this is not a promise by the way), ACA is a very cost-effective way of hosting your (micro)services. ACA comes with different strategies that you can take advantage of. Picking the one that suits best may dramatically save costs compared to your current hosting solution.
Also, running ACA (containers) allows you to scale more flexibly and rapidly. A commonly heard response to that argument is that users of the service may not need flexible and rapid scaling as they just run a simple website without special demands. Although I agree with that take, I also partially disagree, for the simple reason that having a larger software solution with multiple services scaling dynamically probably leverages more dynamic scaling compared to the website of the butcher around the corner but… Still, this butcher can benefit from this scaling as ACA allows the container to scale down to zero instances ending up with no costs at all.
And even when you don’t fully scale back to zero, you may benefit from Azure Container Apps because when you use the ACA consumption plan, the costs of your container instances drop dramatically when your containers are idle.
So, how do we do it?
In this section, I will show how to build an image and then bring it to a container registry, given you already have access to a container registry. This can be Docker Hub or for example an Azure Container Registry that you can provision and maintain yourself.
Building a container
When you want to run Azure Container Apps, it is (already in the name) mandatory to run containers. That means that you need to ‘containerize’ your software system. This sounds complicated, but can in fact be a walk in the park. For most technologies (.NET, Java, PHP, Node, Python, etc.) there are plenty of examples of how to create a container. It basically comes down to writing a text file called a Dockerfile. Then, with Docker installed run the docker build command in a terminal, pointing to your dockerfile. As a result, a container image will be created and stored on your local machine (or the machine where you execute the docker build command). So when you use Azure DevOps pipelines or GitHub Actions, for example, the Docker image will be created on the agent running the job. This is important to understand because when you want to run a container service, this service must be able to grab the container image from a location it can reach. Your local machine or an agent of a workflow running somewhere is not sufficient.
Pushing the container
The solution is to use a container registry. This registry is basically a repository of images that your service can pull images from. You can use a public container registry, or deploy your own. Please note that free container registries often force you to make your images publicly available. So when you don’t want to expose your container image to the public internet, it may be a good idea to provision your own registry. The container registry controls authentication and authorization and thus checks whether or not the user trying to access a container image, is allowed to do so.
So now when you have created a container image on a local machine somewhere, you need to push that container to a registry. Obviously, this machine (again) needs permission to be able to push the image. But when it has, it can make the image available from the registry so your container service (in this example Azure Container Apps) can pull the image from the registry and run it.
An example
In this example, I have an ASP.NET Web API service that I want to host with ACA. I need to containerize it, so I need to create a Dockerfile. You can use VisualStudio.NET to generate the Dockerfile for you, and this is what it looks like:
FROM mcr.microsoft.com/dotnet/aspnet:8.0 AS base
USER app
WORKDIR /app
EXPOSE 8080
EXPOSE 8081

FROM mcr.microsoft.com/dotnet/sdk:8.0 AS build
ARG BUILD_CONFIGURATION=Release
WORKDIR /src
COPY ["Your.Project/Your.Project.csproj", "Your.Project/"]
RUN dotnet restore "./Your.Project/./Your.Project.csproj"
COPY . .
WORKDIR "/src/Your.Project"
RUN dotnet build "./Your.Project.csproj" -c $BUILD_CONFIGURATION -o /app/build

FROM build AS publish
ARG BUILD_CONFIGURATION=Release
RUN dotnet publish "./Your.Project.csproj" -c $BUILD_CONFIGURATION -o /app/publish /p:UseAppHost=false

FROM base AS final
WORKDIR /app
COPY --from=publish /app/publish .
ENTRYPOINT ["dotnet", "Your.Project.dll"]
The file means, use the aspnet:8.0 image as a base to start from, and expose ports 8080 and 8081. As you may know, since .NET 8, the default port ASP apps run on is changed to 8080. Then it copies the source of your project to the container and executes a dotnet restore to restore all NuGet packages. Then it executes a dotnet build and dotnet publish to complete the compilation process and end up with a set of binaries that you can run as a Web API. Finally, to run the container, run dotnet Your.Project.dll to run the container.
GitHub Action to create and push the image
Consider the following GitHub Action job:
build:
    runs-on: ubuntu-latest
    needs: versionize
    steps:
        - uses: actions/checkout@v3
        - name: Build container images
        working-directory: src
        run: |
            docker build . --file Dockerfile --tag ${{ secrets.ACR_LOGIN_SERVER }}/$IMAGE_NAME:1.0.0
        - name: Login to ACR
        uses: azure/docker-login@v1
        with:
            login-server: ${{ secrets.ACR_LOGIN_SERVER }}
            username: ${{ secrets.ACR_USERNAME }}
            password: ${{ secrets.ACR_PASSWORD }}
        - name: Push container images
        working-directory: src
        run: |
            docker push ${{ secrets.ACR_LOGIN_SERVER }}/$IMAGE_NAME:1.0.0
The job above is part of a workflow that creates a docker image, logs in to a docker registry, and then pushes the image to that registry. Note that the container registry information comes from secrets in a GitHub repository. If you use such secrets, never hard-code them. Also, the name of the container is parameterized. The version for this image is hard-coded to version 1.0.0. I strongly recommend using a versioning mechanism like Semantic Versioning to make sure each and every commit to your source code repository ends up as a new container version automatically.
Let’s run it!
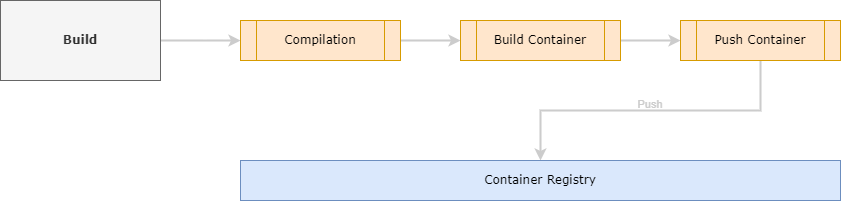
Roughly seen, deploying a piece of software exists in two phases. One phase would be the build phase, as described above. It results in an artifact, or in the case of this example in a container image pushed to a registry. The second phase would be the deployment step.
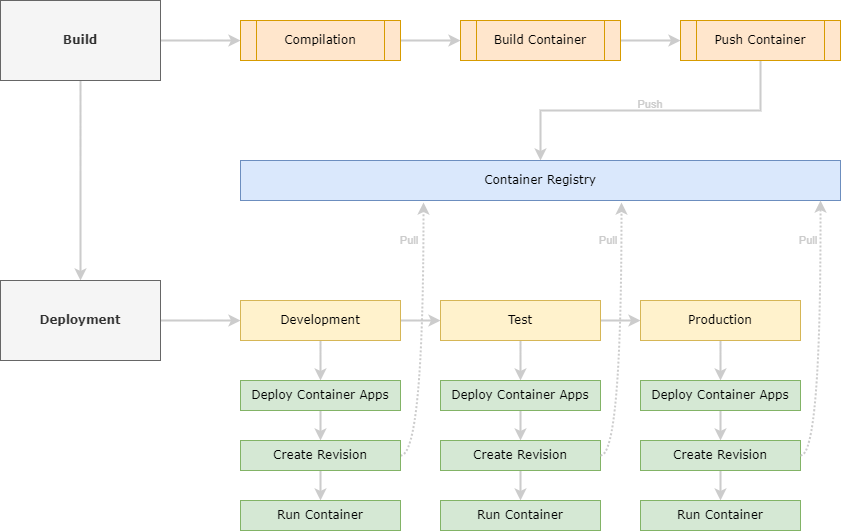
So the next phase is to deploy your software. Since the goal is to use Azure Container Apps, we now need an Azure Container App. But… An Azure Container App requires a Container Apps Environment. An environment is a boundary around one or more Container Apps. You can (and sometimes should) host more Container Apps in one Container Apps Environment. When the Container Apps have some kind of cohesion, like in a microservices environment where all the microservices together form a complete solution, or Container Apps need to interact with each other, it is a good idea to host these Container Apps in a shared Environment.
Deploy the Azure Container Apps Environment
I use Bicep to create the Container Apps Environment. You can deploy the resource using the following Bicep:
resource containerAppsEnvironment 'Microsoft.App/managedEnvironments@2023-04-01-preview' = {
  name: 'name-of-your-container-apps-environment'
  location: location
  properties: {
    appLogsConfiguration: {
      destination: 'log-analytics'
      logAnalyticsConfiguration: {
        customerId: logAnalyticsWorkspace.properties.customerId
        sharedKey: logAnalyticsWorkspace.listKeys().primarySharedKey
      }
    }
  }
}
This will deploy a new container apps environment and basically accept all the defaults. It is important though, to configure some kind of logging. It is common that, especially when you’re testing and trying to get Container Apps up and running, that stuff goes wrong. In those cases, you really want to have some kind of logging mechanism in place to be able to track where your problem came from to be able to fix the problem more efficiently.
Note, this example deploys a container apps environment and will then immediately throw a Container App on top of that. A more real-world scenario would be different containers in one environment with maybe more services that allow your services to integrate with each other. In those cases, the Azure Container Apps Environment has a different life cycle compared to the Container Apps it contains and should therefore be organized in a separate Resource Group.
Adding the Container App to the Environment
Now all we need to do is to add a Container App to the Environment. The Bicep template is fairly large, so read through it. Below the Bicep, I will go through all the different chunks and explain what’s going on. The complete bicep to do so looks like this:
resource apiContainerApp 'Microsoft.App/containerApps@2023-04-01-preview' = {
  name: 'your-container-apps-name'
  location: location
  identity: {
    type: 'SystemAssigned'
  }
  properties: {
    environmentId: containerAppsEnvironment.id
    managedEnvironmentId: containerAppsEnvironment.id
    configuration: {
      activeRevisionsMode: 'Single'
      dapr: {
        enabled: false
      }
      ingress: {
        external: true
        targetPort: 80
        transport: 'http'
        corsPolicy: {
          allowedOrigins: [
            'https://some-domain.com'
          ]
          allowCredentials: true
          allowedMethods: [
            'GET'
            'OPTIONS'
          ]
        }
      }
      secrets: [
        {
          name: containerRegistryPasswordSecretRef
          value: containerRegistry.listCredentials().passwords[0].value
        }
      ]
      maxInactiveRevisions: 1
      registries: [
        {
          server: containerRegistry.properties.loginServer
          username: containerRegistry.properties.adminUserEnabled ? containerRegistry.name : null
          passwordSecretRef: containerRegistryPasswordSecretRef
        }
      ]

    }
    template: {
      containers: [
        {
          name: defaultResourceName
          image: '${containerRegistry.properties.loginServer}/${systemName}:${containerVersion}'
          env: [
            {
              name: 'APPLICATIONINSIGHTS_CONNECTION_STRING'
              value: applicationInsights.properties.ConnectionString
            }
          ]
          resources: {
            cpu: json('0.25')
            memory: '0.5Gi'
          }
        }
      ]
      scale: {
        minReplicas: 1
        maxReplicas: 6
        rules: [
          {
            name: 'http-rule'
            http: {
              metadata: {
                concurrentRequests: '30'
              }
            }
          }
        ]
      }
    }
  }
}
So first, the Container App gets a name. In the properties section, the environmentId and managedEnvironmentId hook this Container App into the Environment created earlier.
Then the configuration section. With the activeRevisionsMode you can decide what strategy to run containerrevisions. The setting allows you to run multiple versions of a container at once (setting the activeRevisionsMode to Multiple) or one revision at a time, setting the activeRevisionsMode to Single.
The dapr configuration allows you to configure DAPR. For this single container, we don’t need DAPR, but… Stay tuned, I will post a new blog about DAPR shortly.
With ingress, you can define how traffic flows into your Container Apps. There are three flavors that depend on wether or not you integrate into an already existing virtual network or not. But it basically boils down to ‘accept everything’ or ‘accept only traffic from my network’.
In secrets, you can safely store secrets used in your container. So for example connection strings or passwords should be stored in secrets. Be careful with using secrets, If you need to use secrets in your app, like API Keys, for example, I strongly recommend using a KeyVault. In this example, I store the password of the container registry to be able to pull the container image from the registry.
In registries, you can define one or more registries to pull images from. When a new revision is created, the container it needs to run will be pulled (downloaded) from the registry.
The template section is where you configure the container you want to run on ACA. So the name, but also the full name of the image (including the tag) to pull from the registry, the environment variables to set. You can configure your container using the environment variables, but for most solutions, I would probably recommend using the Azure App Configuration service. With the resources, you reserve a certain amount of computing and memory for your image. This is what you actually pay for. The higher the amount of computing and memory reserved, the more expensive your app will be.
Finally, the scale section is where you configure the scaling behavior of your ACA. In this case, I configured the service to scale up to a maximum of 6 replicas and scale back down to a minimum of 1 replica. Container Apps allow you to scale back to 0, but for Web Apps, take into account that it takes some time for a replica to spin up. So a Web App scaled back to 0, will have a minimum latency of 10 to 15 seconds before it responds to an incoming request. This is the time it takes to pull the image from the container and spin it up. Additionally, it will take some time for your app to spin up as well. With the concurrentRequests, Container Apps will assess the number of requests per second. At an interval of 15 seconds, it will check the amount of incoming (HTTP) requests and divide that by 15. If the result exceeds the concurrentRequests, ACA will scale up by the number of instances required to fit the incoming load. So if it (in that period of time) received 80 requests per second (about three times the configured load) it will scale up to 3 replicas. Whether or not the ACA can scale back in is assessed at an interval of once a minute.
Conclusion
Yes, using Azure Container Apps does come with a lot of moving parts and is different from straight forward deploying your system to a managed cloud service. However, with this post I hope I simplified the steps to take and encourage you to take the step to go ahead and spin the service up.
Last modified on 2024-03-17