SignalR has been the authority for real-time communication for (especially) ASP.NET and web developers. It is easy to use, flexible, yet powerful and fast. And with its fallback scenarios, not only works on your machine ;). There are three fallback scenarios (Server-Sent Events, Forever Frame, and (Ajax) Long polling) which are sort of outdated. This is because the primary way of communicating is through WebSockets. The support for WebSockets has grown over time. Modern browsers nowadays all support WebSockets basically meaning that all these fallback scenarios became redundant.
Scroll down if you want to see Azure Web PubSub in action
Getting started
The Azure Web PubSub Service comes in two flavors: Standard, and Free. Obviously, you can get the Free version at no cost, but it is limited to a maximum of 20 connections, 40,000 KB outbound traffic, and has no SLA. The basic version allows up to 1,000 connections, 2,000,000 KB of outbound traffic a day (per unit). You can scale up the number of units as required. Each unit costs around 41 Euros a month at the time of writing this article.
Log in to the Azure Portal and create a new instance of the ‘Web PubSub Service’. You will see a screen similar to the figure shown below.
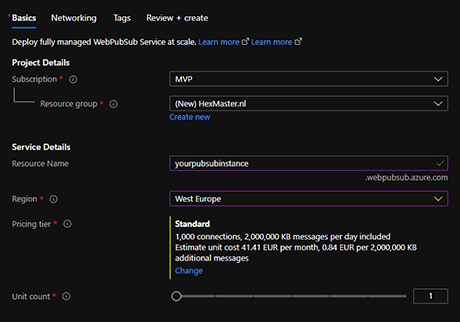
Click through the wizard to create your Web PubSub Service instance. Once your Azure Web PubSub Service has provisioned successfully, navigate to its properties and view the Keys page. This is where you can find the secrets to connect to Azure Web PubSub.
Connecting
With Web PubSub Microsoft evolved the SignalR system into a new slick and optimized system for real-time communication. First of all, there are no client-side libraries required. Although there are some libraries available for convenience purposes it is totally not required since you can just use JavaScript’s native WebSocket object to connect. What I do recommend, is to use a backend system to generate connection information for a client (front-end). You don’t have to, but I think it’s more convenient.
Generating connection information for a client using C# looks like this:
var pubSubClient = new WebPubSubServiceClient(
    webPubSubConnectionString,
    pubSubHubName);
var clientConnectionInformation = await psClient.GetClientAccessUriAsync();
Se when you create a web endpoint end execute this code, you can pass the clientConnectionInformation back to the client, which is basically a Uri that can be used to connect.
In javascript (or typescript) you can create a new WebSocket object passing in the value generated in the backend as a URL and your connection will be created.
let ws = new WebSocket(clientConnectionInformation);
Handling messages
You can handle incoming messages by creating an event handler on the WebSocket object in your client code. Given you have established a connection using the example above, you can add a handler like so:
websocket.onmessage = (msg) => {
  handleRealTimeMessage(msg);
};
It is a good idea to think of a standard (message) structure. Your client is going to need to parse and interpret those messages so if you implement some kind of contract for the messages you’ll make life a lot easier for yourself.
Sending messages
You can send messages from your backend system as well as your front-end system. In reality, most of the messages are generated in the backend, except for when a system is purely client-side. For example, if you create a chat application, you don’t need the backend. You can send messages to other clients right from the browser. But, if you choose to store the messages in some kind of repository, in most cases, you are going to make a round trip to the server and if so, it makes way more sense to publish the Web PubSub message from the backend when the persistence operation succeeded.
If you do want to send messages from your client, you call the send() method on the instance of your WebSocket object like so:
ws.send("This is the message content");
Obviously, you can also stringify an object and send that as a string in JSON format for example.
From a backend system, and again I’m using C# for this example, you can use the WebPubSubServiceClient object instance to send your message:
await psClient.SendToAllAsync("This is the message content");
Everyone with an active (opened) connection to Azure Web PubSub will now receive your message ‘This is the message content’. But what if you don’t want to target everyone?
Connections, users, and groups
For more advanced scenario’s you can choose to organize message flows with groups. You can create groups and add connections or users to groups. You can then send a message to a specific group. This way, only members of the group will receive that message. I think using the ‘user’ approach is a bit more convenient. A lot of systems require you to log in or identify yourself. In those cases, the user information is already known. You can pass this information in when you generate the connection information to make Azure Web PubSub aware of this user.
var pubSubClient = new WebPubSubServiceClient(
    webPubSubConnectionString,
    pubSubHubName);
var clientConnectionInformation = await psClient.GetClientAccessUriAsync(
    userId: yourSystemUserId
);
Now if you want to add a user to a specific group, you can call the AddUserToGroup() method like so:
await psClient.AddUserToGroupAsync("group1", yourSystemUserId);
You can only add users to a group when the connection has been established. If you add a user to a group before the connection was established, you will receive an error that the user is not found. So first you create the connection, then you make another round-trip to the server to add the user to a group.
In case you want to manage groups by connections instead of a user, you can call the AddConnectionToGroupAsync() method. On the client, you will need to catch the onmessage event in order to get the connection ID after the connection was established.
These are the basics of Azure Web PubSub. There are even more advanced scenarios, using sub-protocols which make working with groups a lot easier. In my next post, I will demonstrate the usage of one of the sub-protocols.
Demo
As a demonstration, I created an Angular App for Planning Poker. You can start a new session and share the session code with your colleagues. Your colleagues can join using that session code. You can now start planning poker sessions. There is no backend involved except for creating client connections. The source for the backend (Azure Functions) project can be found in GitHub as well as the source for the Angular project. Want to see the project in action? -this-link-is-gone-. This project uses an advanced Azure Web PubSub scenario with a sub-protocol. I will blog about the usage of sub-protocols later this week.
Last modified on 2022-02-13