To start writing that template, first open VS Code. Once you have started VS Code, a welcome screen opens. Press [Ctrl]+[n] to open a new file. To ensure that the ARM tools extension starts, save the file under the name azuredeploy.json. You can use every filename with an extension of .json, and the ARM tools extension should still start.
Start writing your first ARM template by typing arm! at the beginning of the file. This notation is a shortcut that triggers the ARM Tools extension in VS Code. When you press enter, the extension inserts a pre-defined piece of code – called a snippet. In this case, you should see a snippet like this:
{
    "$schema": "https://schema.management.azure.com/schemas/
         2019-04-01/deploymentTemplate.json#",
    "contentVersion": "1.0.0.0",
    "parameters": {},
    "functions": [],
    "variables": {},
    "resources": [],
    "outputs": {}
}
The snippet as a whole, just as every ARM template, takes the shape of a JSON object. The first property called $schema of this object is always a reference to the JSON Schema for ARM templates. JSON Schema is a formal notation to describe the structure of the content in this file. The specified URL is valid, and you can copy it into your browser to read this specification. JSON Schemas are difficult to read and are only used by tools to validate JSON files against the specified schema. Specifying the JSON schema is mandatory for ARM templates, but it is unnecessary to understand its details. The date you see as part of the URL serves as the version number, which may change as newer versions of the schema become available.
Azure Infrastructure as Code
This blog comes from Azure Infrastructure as Code by Henry Been, Eduard Keilholz, and Erwin Staal
Master ARM templates, Bicep scripting, and other Azure Infrastructure-as-Code tools, techniques, and practices to run application infrastructure on the Azure cloud.

The second property specifies what is called the contentVersion. Here you can use a four-part version number for the template. This version is not used by ARM in any way, and if you choose to version your templates, you can follow any system you like. The contentVersion property is optional.
After these two properties, the five properties that make up the main template follow. For now, the properties parameters, functions, variables, and outputs are not used, and to keep your first template simple and easy to understand, you can remove these four lines from your template.
All of this leaves you with an empty shell to which you can add your first Azure resource.
Adding a resource
In most ARM templates, the resources property takes up the larger part. The resources property is an array, which allows for specifying any number of resources within a single template. Each resource is declared as a JSON object.
To declare a resource, navigate the cursor between the two square brackets that make up the still empty resources array and press enter to create some whitespace. ARM templates are not whitespace sensitive, and this also includes line breaks. So whitespace can be anywhere where it is convenient for readability.
MANUALLY INVOKING AUTO-COMPLETE IN VS CODE When typing in VS Code, you can at all times press the [CTRL]+[.] key-combination to invoke VS Code auto-complete and see context-based suggestions.
Next, type arm-storage and watch how the ARM Tools VS Code extension pops up with a list of snippet suggestions. While you type, the list continues to filter, showing only snippets that match what you have typed so far. At any point, when arm-storage is at the top, hit the tab key to accept the snippet and insert the ARM template snippet for creating a storage account. This snippet contains all properties that are mandatory for creating an Azure storage account.
Observe how the extension automatically highlights all properties for which a value is mandatory. First, it selects the value for the new resource’s name property in all locations where it appears. Give your resource a more meaningful name and press Tab again. The cursor now moves to the next property. In this case, updating the other properties is unnecessary, so keep pressing Tab until the cursor stops moving through the properties. With all the properties filled in, let’s explore them all in turn.
Name: Every Azure resource has a mandatory name. The naming rules are different for every type of resource.
Type: This property specifies the type of resource you want to create. The resource type is made out of multiple parts, separated by slashes.
ApiVersion: This property specifies which version of the resource type you want to use.
The combination of the resource type and API version determines which other properties are available to describe the resource. You can find these in the reference at https://docs.microsoft.com/en-us/azure/templates/, from which you can find a screenshot below.
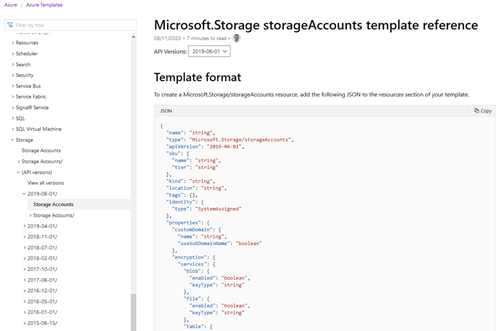
In the reference, look up Storage > Storage Accounts in the tree on the left. Next, in the drop-down at the top, select the correct version for the resource or leave it at the default of latest. The remainder of the page first shows an example resource declaration, followed by every property’s documentation. If you have followed along with the example, your ARM template should now look like this:
{
    "$schema": "https://schema.management.azure.com/schemas/2019-04-
         01/deploymentTemplate.json#",
    "contentVersion": "1.0.0.0",
    "resources": [
        {
            "name": "storage20201227",
            "type": "Microsoft.Storage/storageAccounts",
            "apiVersion": "2019-06-01",
            "tags": {
                "displayName": "storage20201227"
            },
            "location": "[resourceGroup().location]",
            "kind": "StorageV2",
            "sku": {
                "name": "Premium_LRS",
                "tier": "Premium"
            }
        }

    ]
}
Congratulations! That is it. You have just successfully created your very first ARM template, ready for deployment. But before you deploy it, let us first explore VS Code and how it can help you writing templates a bit more.
Leveraging IntelliSense in VS Code
So far, you have used code snippets in VS Code to write a template quickly and have most of it generated. But, the properties generated by these code snippets are only the required properties. When you need to configure optional properties, you have to add them manually. While adding these properties, the ARM Tools extension helps by popping up suggestions.
For storage accounts, it is possible to enforce HTTPS while connecting to the storage account. As using HTTPS is a general recommendation in our field, let’s enable this on our resource. Enforcing HTTPS can be done by setting the property supportsHttpsTrafficOnly to true. This property has to be nested in another object, called properties.
A PROPERTY CALLED PROPERTIES. Many Azure resources have most or all of their extra properties grouped within another object. This object is then used as the value for a property called properties. This name might sound confusing at first, but it is not an error in this book.
To make this change, scroll down to the bottom of your template and add a new property at the end of the resource: add a comma, and start typing properties. As soon as you have typed the p, the suggestion for properties should already pop up. Just pressing Tab completes the entry. Continue by typing a colon and then “this is a mistake.” Once you have done this, your editor shows something like the following when you hover over properties with your mouse:
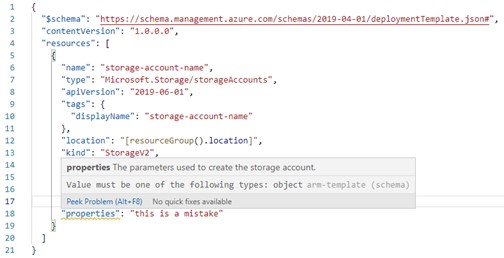
In this screenshot, you see that the editor not only automatically completes entries you are making, it also continuously validates the template and provides you with feedback when there are any errors. In this case, the error is that the properties property should not be of type string, but of type object. Replacing the text and the enclosing quotes with {} removes the error.
Within the curly braces you just added, press Enter and start typing supportsHttpsTrafficOnly to invoke auto-complete again and add the property. The value of this property should be true.
After making these final changes, your template should now look like the one below.
{
    "$schema": "https://schema.management.azure.com/schemas/2019-04-
         01/deploymentTemplate.json#",
    "contentVersion": "1.0.0.0",
    "resources": [
        {
            "name": "storage20201227",
            "type": "Microsoft.Storage/storageAccounts",
            "apiVersion": "2019-06-01",
            "tags": {
                "displayName": "storage20201227"
            },
            "location": "[resourceGroup().location]",
            "kind": "StorageV2",
            "sku": {
                "name": "Premium_LRS",
                "tier": "Premium"
            },
            "properties": {
                "supportsHttpsTrafficOnly": true
            }
        }

    ]
}
This last change completes the ARM template for deploying a storage account in Azure. But writing templates doesn’t deliver value unless you deploy them. So let’s go and deploy this template!
If you want to learn more about the book, you can check it out on Manning’s liveBook platform here.
Last modified on 2021-10-12